Autodesk Installers
Before starting the upgrade process, please ensure you have the latest copies of the software you will be upgrading. Copy to your server all files downloaded.
Suggested location would be C:\Autodesk\Install
.NET framework
Starting from NLRS v1.2 and higher, Windows operating systems requires .NET runtime v4.6 installed.
The NLRS Windows installer will attempt to self-install .NET 4.6 from the internet. However offline servers and Windows Server platforms need to have .NET 4.6 installed prior to running the NLRS installer. The offline .net installer
can be found here.
Note: A Windows Dotnet upgrade could require a reboot of the customers server. Please ensure you are authorized by the customer to restart the server before starting the install process
Preparation
Backup
- Prior to upgrading NLRS and NLM, it is recommended to backup the current NLRS and NLM install folders. Please copy all install files to the following location
C:\Autodesk\backup\{todays date}
Example:
C:\Autodesk\backup\28Mar2018\Network Licensing Reporting Service
C:\Autodesk\backup\28Mar2018\Network License Manager
Create a plan
At this point, take a moment to formulate a plan on completing the upgrade. Stopping an NLM instance will directly impact the customer access to Autodesk software, so the goal is to have the license service down for less than five
minutes. In order to ensure a successful upgrade, the following details should be collected before starting the process.
| Application |
Setting |
Value |
| NLM
|
Service name |
Name of Autodesk License Manager Service |
| | Installation location |
File Path Default is "C:\Autodesk\Network License Manager
|
|
| | License file location and file name |
File Path
|
|
| | New License file location If upgrading
|
File Path
|
|
| | Service Account User |
Local System account or elected account |
|
| | |
|
|
| NLRS
|
PII masking Enabled |
Yes / No
|
| | PII Masking Mapping File |
File Path
|
|
| | Proxy Server Enabled |
Yes / No
|
|
| | Server is connected to Internet |
Yes / No
|
|
| | Service Account User |
Local System account or elected account |
|
Stopping NLRS and NLM
-
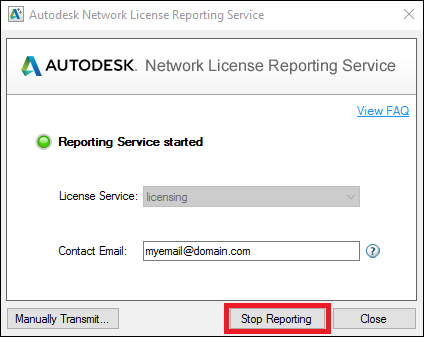
From NLRS install location, launch NLRS configuration panel - CARConfigPanel.exe and stop NLRS service.
-
Once NLRS service is stopped, close the dialog.
-
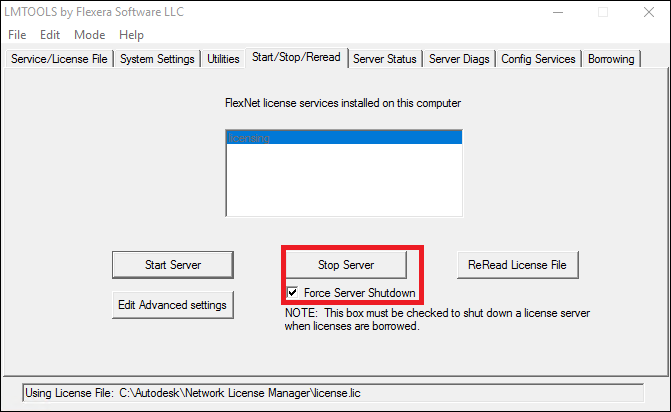
From NLM install location, launch NLM configuration panel lmtools.exe. Select Start/Stop/Reread tab and stop Autodesk Network Licensing service.
Removing NLM
-
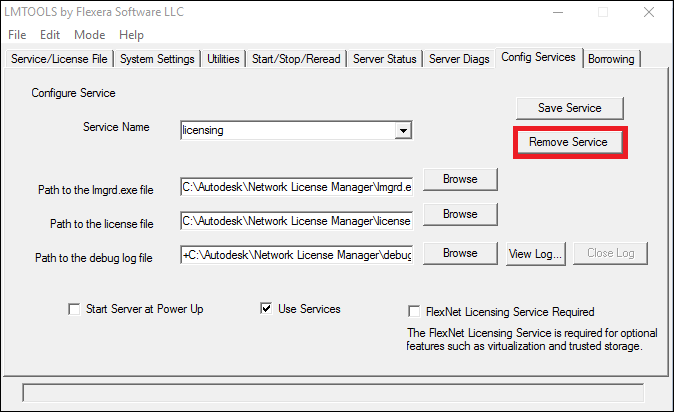
Once the Autodesk Network Licensing service is stopped, select Config Services tab and remove the Autodesk Network Licensing service.
-
Once the Autodesk Network Licensing service is removed, close the dialog.
-
From Windows Control Panel, select Add/Remove Program and uninstall NLM.

Installing NLM
-
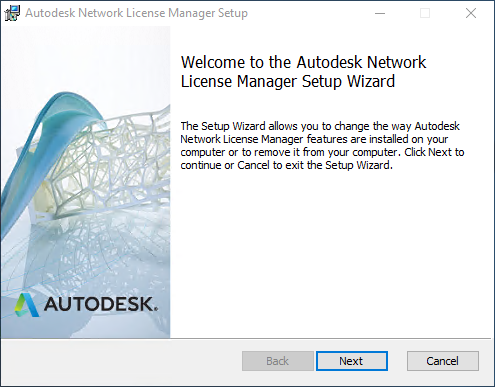
Run the latest NLM installer NLM.msi
-
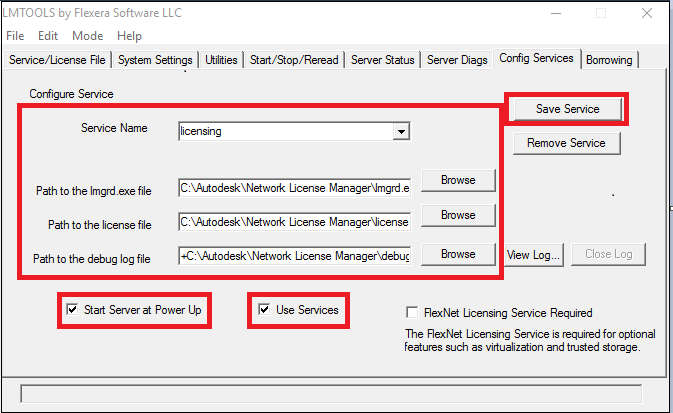
Once NLM is installed, from NLM install location launch NLM configuration panel lmtools.exe. Select Config Services tab and create Autodesk Network Licensing service.
-
Ensure previous settings recording are reinstated.
-
Ensure that the license file is selected. If a newer license is available for use, its path should be given here.
-
Ensure that append mode (+) is added to the start of selected debug log file.
-
Ensure that Use Services is checked.
-
Ensure that Start Server At Power Up is checked.
-
Ensure that the created service is saved.
-
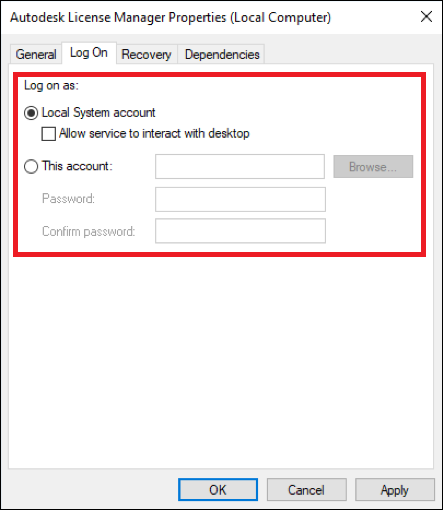
From the Run dialogue or Start Search, enter and run services.msc
-
Verify the user account used for the Autodesk Network License Manager Service created in the last step. In the Windows service window, double-click NLM service and navigate to the Log On tab and verify that it is
set to the previous settings.
-
Close the Windows services dialogs
-
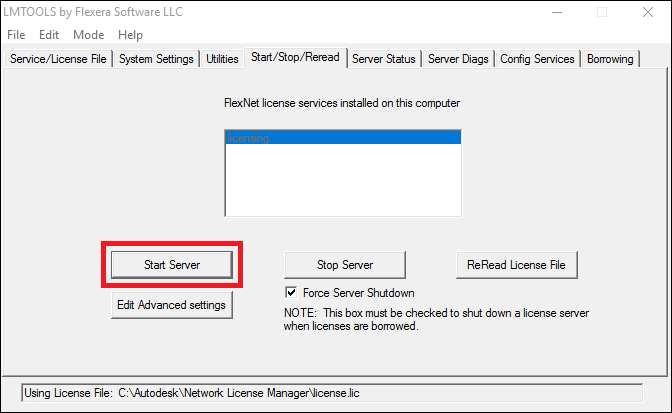
Within the lmtool.exe Select Start/Stop/Reread tab and start Autodesk Network Licensing service.
-
Once Autodesk Network Licensing service is started, close the dialog
Updating NLRS
-
Run the latest NLRS installer NetworkLicenseReportingServiceSetup.exe
-
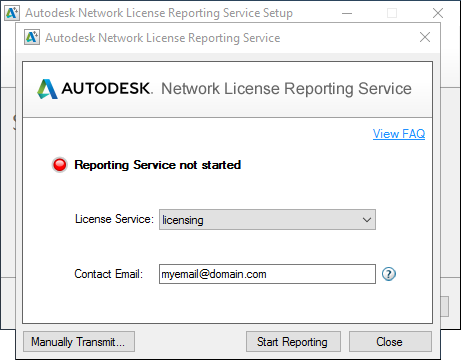
Once installation is completed, NLRS configuration panel CARConfigPanel.exe will be launched.
-
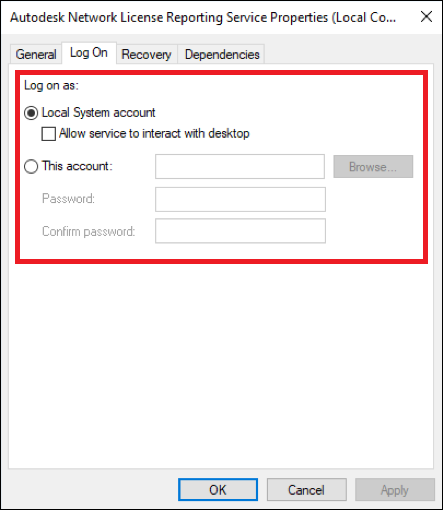
Verify the user account used for the Autodesk Network License Reporting Service created in the last step. In the Windows service window, double-click NLRS service and navigate to the Log On tab and verify that it
is set to the previous settings.
-
Verify the NLRS CARConfigPanel.exe.config 'configuration is as expected.
-
Customers expecting Personal Information Masking to be enabled, will require the following settings populated.
  <add key="EnablePIIMask" value="true" />
  <add key="PIIMappingFilePath" value="FILE_PATH" />
-
Customers with manually configured proxy environments will require the ProxyUri settings populated. Note, proxy value must be given with URI scheme prefix such http
<add key="ProxyUri" value="http://HostName:[PortNumber]"/>
-
Customers with servers who remain discontented from the internet will require the OfflineMode setting populated
<add key="OfflineMode" value="true" />
-
Ensure the CARConfigPanel.exe.config is no longer open in any editor.
-
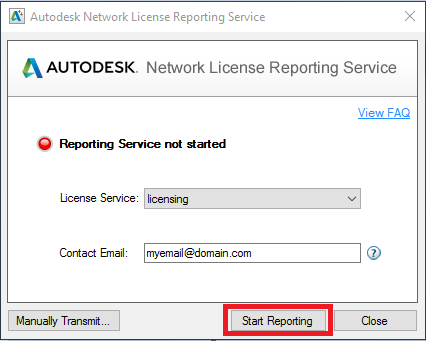
Start NLRS service.
Verifying Install
-
Confirm NLRS is running correctly (not applicable for offline customer)
-
Open carservice.log in Log folder at NLRS install location. If Application Log File Properties is specified in NLRS configuration, access the specified location instead to locate the carservice.log.
-
Check that a valid response containing
  status: 199
  [Request successfully posted to queue for processing]" is
  received from Autodesk server after service is started.
-
Once NLRS service is started successfully, close the dialog.
Preparation
Backup
- Prior to upgrading NLM, it is recommended to backup the current NLRS and NLM install folders. Please copy all install files to the following location
C:\Autodesk\backup\{todays date}
Example:
C:\Autodesk\backup\28Mar2018\Network License Manager
Create a plan
At this point, take a moment to formulate a plan on completing the upgrade. Stopping an NLM instance will directly impact the customer access to Autodesk software, so the goal is to have the license service down for less than five
minutes. In order to ensure a successful upgrade, the following details should be collected before starting the process.
| Application |
Setting |
Value |
| NLM
|
Service name |
Name of Autodesk License Manager Service |
| | Installation location |
File Path Default is "C:\Autodesk\Network License Manager
|
|
| | License file location and file name |
File Path
|
|
| | New License file location If upgrading
|
File Path
|
|
| | Service Account User |
Local System account or elected account |
|
Stopping NLRS and NLM
-
From NLRS install location, launch NLRS configuration panel - CARConfigPanel.exe and stop NLRS service.

-
Once NLRS service is stopped, close the dialog.
-
From NLM install location, launch NLM configuration panel lmtools.exe. Select Start/Stop/Reread tab and stop Autodesk Network Licensing service.

Removing NLM
-
Once the Autodesk Network Licensing service is stopped, select Config Services tab and remove the Autodesk Network Licensing service.

-
Once the Autodesk Network Licensing service is removed, close the dialog.
-
From Windows Control Panel, select Add/Remove Program and uninstall NLM.

Installing NLM
-
Run the latest NLM installer NLM.msi

-
Once NLM is installed, from NLM install location launch NLM configuration panel lmtools.exe. Select Config Services tab and create Autodesk Network Licensing service.
-
Ensure previous settings recording are reinstated.
-
Ensure that the license file is selected. If a newer license is available for use, its path should be given here.
-
Ensure that append mode (+) is added to the start of selected debug log file
-
Ensure that Use Services is checked.
-
Ensure that Start Server At Power Up is checked.
-
Ensure that the created service is saved.

-
Select Start/Stop/Reread tab and start Autodesk Network Licensing service.

-
Once Autodesk Network Licensing service is started, close the dialog
-
From NLRS install location, launch NLRS configuration panel CARConfigPanel.exe and start NLRS service.

-
Confirm NLRS is running correctly - not applicable for offline customers
-
Open carservice.log in Log folder at NLRS install location. If Application Log File Properties is specified in NLRS configuration, access the specified location instead to locate the carservice.log.
-
Check that a valid response containing
  status: 199
  [Request successfully posted to queue for processing]" is
  received from Autodesk server after service is started.
-
Once NLRS service is started successfully, close all the dialog.
Preparation
Backup
- Prior to upgrading NLRS, it is recommended to backup the current NLRS and NLM install folders. Please copy all install files to the following location
C:\Autodesk\backup\{todays date}
Example:
C:\Autodesk\backup\28Mar2018\Network Licensing Reporting Service
Create a plan
At this point, take a moment to formulate a plan on completing the upgrade. Upgrading an NLRS incorrectly can prevent Autodesks collecting usage data correctly. In order to ensure a successful upgrade, the following details should
be collected before starting the process.
| Application |
Setting |
Value |
| NLRS
|
PII masking Enabled |
Yes / No
|
| | PII Masking Mapping File |
File Path
|
|
| | Proxy Server Enabled |
Yes / No
|
|
| | Server is connected to Internet |
Yes / No
|
|
| | Service Account User |
Local System account or elected account |
|
-
Run the latest NLRS installer NetworkLicenseReportingServiceSetup.exe
-
Once installation is completed, NLRS configuration panel CARConfigPanel.exe will be launched.

-
Verify the user account used for the Autodesk Network License Reporting Service created in the last step. In the Windows service window, double-click NLRS service and navigate to the Log On tab and verify that it
is set to the previous settings.

-
Verify the NLRS CARConfigPanel.exe.config 'configuration is as expected.
-
Customers expecting Personal Information Masking to be enabled, will require the following settings populated.
  <add key="EnablePIIMask" value="true" />
  <add key="PIIMappingFilePath" value="FILE_PATH" />
-
Customers with manually configured proxy environments will require the ProxyUri settings populated. Note, proxy value must be given with URI scheme prefix such http
<add key="ProxyUri" value="http://HostName:[PortNumber]"/>
-
Customers with servers who remain discontented from the internet will require the OfflineMode setting populated
<add key="OfflineMode" value="true" />
-
Ensure the CARConfigPanel.exe.config is no longer open in any editor.
-
Start NLRS service.

-
Confirm NLRS is running correctly (not applicable for offline customer)
-
Open carservice.log in Log folder at NLRS install location. If Application Log File Properties is specified in NLRS configuration, access the specified location instead to locate the carservice.log.
-
Check that a valid response containing
  status: 199
  [Request successfully posted to queue for processing]" is
  received from Autodesk server after service is started.
-
Once NLRS service is started successfully, close the dialog.
-
From NLRS install location, launch NLRS configuration panel CARConfigPanel.exe and stop NLRS service.

-
Once NLRS service is stopped, close the dialog.
-
From NLM install location, launch NLM configuration panel --
lmtools.exe. Select Start/Stop/Reread tab and stop Autodesk Network Licensing service.

-
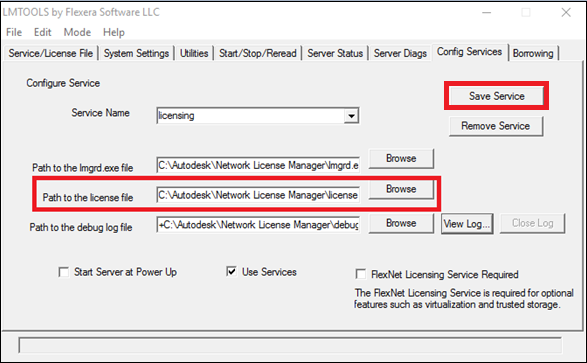
Select Config Services tab and change the license file.
- Ensure that the created service is saved.
-
Select Start/Stop/Reread tab and start Autodesk Network Licensing service.

-
Once Autodesk Network Licensing service is started, close the dialog
-
From NLRS install location, launch NLRS configuration panel CARConfigPanel.exe and start NLRS service.

-
Confirm NLRS is running correctly - not applicable for offline customers
-
Open carservice.log in Log folder at NLRS install location. If Application Log File Properties is specified in NLRS configuration, access the specified location instead to locate the carservice.log.
-
Check that a valid response containing
  status: 199
  [Request successfully posted to queue for processing]" is
  received from Autodesk server after service is started.
-
Once NLRS service is started successfully, close all the dialog.
|